Tuesday 10 July 2012

Configure Dynamics Ax Global Search,Data Crawler


This feature is not one of those that are well hidden. It has taken over the shortcut key Ctrl+F that used to call up the Filter by field dialog box. You might even have accidentally brought up this attractive feature during system demo. However it does not work out of the box. Let us look at the configuration required
Dynamics Ax Global Search is new feature added to the task pane in Dynamics Ax 4.0. It enables users to search for information without specifying the table and field as opposed to conventional search. Although the name global, it is not as global as you might first thought. The keyword entered is searched through fields across tables you selected only.
Dynamics Ax Global Search Task Pane The Global Search Task Pane could be brought up in three ways. You could do it by clicking on the Binocular button on the tool bar, selecting the menu Edit > Find, or by pressing the shortcut key Ctrl + F.
The figure on the right illustrates a Global Search pane with result from the keyword "new york". The Categories combo box allows the user to see results from specific tables only. Clicking on the result would open the form of the designated record with the row focused.

Configuration Procedure

There are two components relevant to this feature. You may find both under menu Basic > Setup > Data Crawler. They are Table Setup and Data Crawler Setup. The former defines the table that you would like searchable within Dynamics Ax Global Search. The latter is the crawler that would build up the search index. Search will be performed on this index and not on the actual data itself.

1. Table Setup

This form is found at the main menu Basic > Setup > Data Crawler > Table Setup. This is where you specify the table that you would like searchable under Dynamics Ax Global Search. The following figures show the Table Setup form.

Global Search - Table Setup
Global Search - Table Setup - Text Index
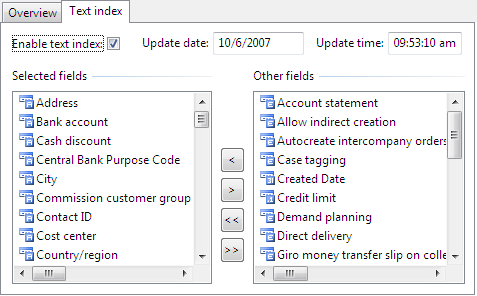
The Incremental checkbox you find on Overview tab indicates that indexing would be done for newly modified record only. This is only applicable for tables with modified date field. It is automatically checked if the table has the field. You are not given an option to check or uncheck this field.
In the tab Text index, you will find the fields added for indexing as well as two columns named Updated date and Updated time. They indicate when is the last time an index has been built for that table. They have impact on tables with Incremental checked. If you add a new field for text indexing after the table has been indexed, the added field will not be indexed until the data is modified. You will have to recreate index to have the field searchable. Recreating index is discussed shortly.
Tables without incremental checked will not face this problem. You may add a field for indexing anytime. The data crawler will pick it up during it subsequent scheduled crawl.


Global Search - Table Setup - Add all field

When you add a new table to the list, you will see a dialog box like the one shown above. The system will ask you whether you want to add all text fields to text index. While this facility eases the setup, it could cost some performance running under production environment. Understanding the intention of Global Search for the company and configuring accordingly is advisable.

2. Data Crawler Setup

You could find Data Crawler setup in Basic > Setup > Data Crawler > Data Crawler. This form is use to configure and manage the state of Data Crawler for each company. The following figure shows the Data Crawler Setup form.


Global Search - Data Crawler

You will get the message “The search indexing engine is not started” for every single search you perform if Data Crawler is not started. The result will still be shown but information might not be up to date. This is where you start the data crawler if it is not configured to start automatically.
You may also set the Data Crawler to start automatically. You do so by checking the Start crawler automatically checkbox in this form. You may define the speed of indexing. The speed settings and the description of the amount of resources it will consume are included in the Crawler speed combo box.
This is the place to recreate index too. We have touched one scenario where re-indexing is required in the previous section. You just have to check the Recreate index checkbox prior to starting crawler to rebuild index.
The option to run crawler in foreground is available from here too. This is done by deselecting the Run in background checkbox. However, I have not found a use for this option as starting the crawler with this option will freeze the Dynamics Ax client. Please let us know if you have found the use of this option.

Final Thoughts

When it comes to data search that spans tables, security control is always a concern. This particular feature has to comply with User Group Permissions and Record Level Security to be useful.

You can always reach me at axapta4all@gmail.com
Anonymous Axaptian   

Monday 18 June 2012

Problem Solving Techniques in Ax


Sometimes, when developing, AX doesn’t work as expected, or behaves weird.
Here are some of the things you can try if you run out of ideas, roughly in the order I do:

Try again
You probably already did, but make sure you can reproduce the problem. If it only occurred once, it’s not a problem.

Check your code again
Check your code carefully for errors, and maybe ask a colleague’s opinion.

Compile
Your project might contain compile errors, so compile it to be sure.

Close the debugger
Sometimes, when the debugger is active, AX will keep executing ‘old’ code. Close the debugger to make sure the latest code is executing.

Compile forward
When you have modified a class that is inherited by other classes, you might want to compile forward this class.

Synchronize data dictionary
You may have made changes to application objects that haven’t been synchronized with the database. Open the AOT, right click on the Data Dictionary node and choose Synchronize.

Restart AX client
Simple as that, close the AX client and start it again.

Reset usage data
Go to options screen (AX button > Extra > Options) and click the Usage Data button. Click reset to remove this data.

Check the application event log for clues
Open the event viewer on the AOS to see if the AOS service has logged something in it. Messages here can help you a great deal. You can also check the event log on the database server or your client pc.

Google it
If you receive an error, just copy and paste it in Google. Most likely you are not the only one having that problem.

Check your client version
Check your AX client version. You might for example be connecting to a SP1 application with an SP0 client. You can check this in the about screen: AX button > Help > About. The kernel version indicates the client version, below that is the application version.

Refresh AOD, Dictionary and Data
You can flush cashed information using three option in the Tools > Development tools menu: refresh AOD, refresh Dictionary and refresh Data. This can be useful when you just imported an xpo file, or when you are developing for the enterprise portal.

Delete AUC file
The application Unicode object cache file, if there is one, is located at C:\Documents and Settings\[USERNAME]\Local Settings\Application Data for xp, or C:\Users\USERNAME\AppData\Local for vista. Delete this file while the AX client is closed.

Check if other users are having the same problem
Knowing whether you are the only one that’s having that problem or if it’s a general problem is a big step towards solving the problem. For example, if you alone have the problem, restarting the AOS probably won’t solve it, but removing usage data might.

Check security settings
When only some users have a problem, big changes are that it has something to do with security settings. Security can be set up from Administration > Setup > Security, on the Permissions tab.

Check configuration key setup
Some features of AX won’t work if a configuration key is disabled, be aware of this.

Full compile
Open the AOT, right click the AOT node and select compile.

Restart AOS
Sometimes restarting the AOS solves your problem just fine. If you can, it’s worth the try as this doesn’t take long.

Remove .aoi file
When the AOS is stopped, you can delete the .aoi file from the application files. This file will be rebuilt when the AOS starts.


You can always reach me at axapta4all@gmail.com
Anonymous Axaptian  

ShortCut Keys for Ms Dynamics Ax


Command
Dynamics AX 2012
Dynamics AX 2009
Dynamics AX 4.0
Open the AOT
CTRL+D
CTRL+D
CTRL+D
Open a new Development Workspace
CTRL+SHIFT+W
                 
                   -
Open a new Application Workspace
CTRL+W


Insert a Breakpoint
F9
F9
F9
Toggle Breakpoints
CTRL+F9
CTRL+F9
CTRL+F9
Remove all Breakpoints
CTRL+SHIFT+F9
CTRL+SHIFT+F9
CTRL+SHIFT+F9
Execute
F5
F5
F5
Compile
F7
F7
F7
Comment Selected Code
CTRL+E, C
CTRL+E, C
CTRL+E, C
Uncomment Selected Code
CTRL+E, U
CTRL+E, U
CTRL+E, U
Convert to lowercase
CTRL+SHIFT+U
CTRL+SHIFT+U
CTRL+SHIFT+U
Convert to Uppercase
CTRL+U
CTRL+U
CTRL+U
Display all methods and properties for a class
CTRL+SPACEBAR
CTRL+SPACEBAR
CTRL+SPACEBAR
Save all
CTRL+SHIFT+S
CTRL+SHIFT+S
CTRL+SHIFT+S
Select all application objects in a node
CTRL+A
CTRL+A
CTRL+A
Cancel the selection of an additional item
CTRL+SPACEBAR
CTRL+SPACEBAR
CTRL+SPACEBAR
Open the Properties sheet
ALT+ENTER
ALT+ENTER
ALT+ENTER
Open the Import dialog box
CTRL+SHIFT+I
CTRL+SHIFT+I
CTRL+SHIFT+I
Open Help in AOT
F1
F1
F1


The following shortcut keys have changed since Microsoft Dynamics AX 2009:

Old shortcut key
Command
New shortcut key
CTRL+TAB
CTRL+SHIFT+TAB
Go to next (method) TAB
CTRL+M
CTRL+SHIFT+M
CTRL+F4
ESC
Close editor
CTRL+F4
CTRL+SHIFT+Spacebar
Lookup definition
F12
CTRL+L
Delete line
CTRL+X (with cursor in line, no selection)
ALT+O
Select area/column/block
ALT+MOUSE SELECT
ALT+U
Cancel selection
ESC

 Dynamics AX 2012 (Windows and Menus Shortcuts)
To do this
Press
Display the Navigation Pane if it is collapsed.
ALT+F1
Display the View menu.
ALT+V
Display the Windows menu.
ALT+W
Display the Help menu.
ALT+H
Turn the auto-hide mode for the Navigation Pane on an off.
SHIFT+ALT+F1
Move between modules.
CTRL+TAB
Move the cursor to the address bar.
F11
Use the Back function on the address bar.
ALT+LEFT ARROW
Use the Forward function on the address bar.
ALT+RIGHT ARROW

  Commonly used keys for Data Entry
To do this
Press
Paste contents from your clipboard into the current field.
CTRL+V
Enter the session date in a date field.
D+TAB
For a date time field, press D+TAB, enter a time and then press TAB again.
Enter the current date in a date field.
T+TAB
For a date time field, press T+TAB, enter a time and then press TAB again.
Enter a date from the current month in a date field.
[Day]+TAB
For example, if you enter 12+TAB, the full date for the twelfth of the current month will be displayed.
Enter a date from the current year in a date field.
[MonthDay]+TAB
For example, if you enter 0325+TAB, the full date for March 25 of the current year will be displayed.
Calculate an amount in an amount field.
[Equation]+TAB
For example, if you enter 4*16+TAB, 64 will be displayed in the field.


You can always reach me at axapta4all@gmail.com
Anonymous Axaptian  

Friday 8 June 2012

Get active window handle


static public HWND getActiveWhd()
{
    HWND                  AxClient, AxChild;
    ;

    AxClient = WinApi::findWindowEx(infolog.hWnd(), 0, "MDIClient", "");
    AxChild = WinApi::findWindowEx(AxClient, nullvalue(AxChild), "", ""); 
    return AxChild;
}


Copied from Experts website....... Dynamicsaxtraining.
You can always reach me at axapta4all@gmail.com
Anonymous Axaptian  

Write down the record


To write down the record, which have been just created and does not have modifications use data source method ForceWrite. This method can be used to mark the record as it is changed, and thereby making it a candidate for write, regardless of any changes made to the record. It is valid to call the methods after super in formDataSource::Create(). However, it is not valid in formDataSource::initvalue().


Copied from Experts website....... Dynamicsaxtraining.
You can always reach me at axapta4all@gmail.com
Anonymous Axaptian  

Update assembly configuration file on the fly (from code)


The following code could be used to update the DLL configuration file from the code. It could be useful for example when User changes some parameter in Dynamics AX and .NET assemble should use other instance of external application.

//_webReferenceName - the name of webReference (AOT\References)
//_endPoint - the new address
server static void updateAppConfig(str _webReferenceName, str _endPoint)
{
#define.Ax32Serv('Ax32Serv.config')
#define.endPointTag('endpoint')
#define.addressAttribute('address')

SysReference sysReference;
FilePath serverConfigFile;
Microsoft.Dynamics.IntegrationFramework.WebService.AppDomainCache appDomainCache;
XMLDocument xmlDocument;
XMLNodeList xmlNodeList;
XmlElement xmlElement;
;
//Create SysReference object
new InteropPermission(InteropKind::ClrInterop).assert();
sysReference = SysReference::newFromReferenceName(_webReferenceName);
if (sysReference == null)
{
throw error(strfmt("Referenct '%1' was not found", _webReferenceName));
}
CodeAccessPermission::revertAssert();
//Configure
serverConfigFile = xinfo::directory(DirectoryType::Bin) + #Ax32Serv;
new FileIOPermission(serverConfigFile, SysDataExpImp::readWrite2Mode(ReadWrite::read)).assert();
xmlDocument = new XMLDocument();
xmlDocument.load(serverConfigFile);
xmlNodeList = xmlDocument.getElementsByTagName(#endPointTag);
xmlElement = xmlNodeList.nextNode();
while (xmlElement)
{
xmlElement.setAttribute(#addressAttribute, _endPoint);
xmlElement = xmlNodeList.nextNode();
}
CodeAccessPermission::revertAssert();
//BP Deviation documented
new FileIOPermission(serverConfigFile, SysDataExpImp::readWrite2Mode(ReadWrite::Write)).assert();
xmlDocument.save(serverConfigFile);
CodeAccessPermission::revertAssert();
//Reset application cashe - update end point adress
new InteropPermission(InteropKind::ClrInterop).assert();
appDomainCache = Microsoft.Dynamics.IntegrationFramework.WebService.AppDomainCache::get_Instance();
if (appDomainCache)
{
appDomainCache.Remove('LaserNet');
}
CodeAccessPermission::revertAssert();
}


Copied from Experts website....... Dynamicsaxtraining.
You can always reach me at axapta4all@gmail.com
Anonymous Axaptian  

Some issues during changing index uniqueness


Some times we need to create a new unique index or alter existing one, but table may already contain duplicate data for this index and our changes could not be applied until data in table fixed to support uniqueness. We could do it by deleting records in the table but due to huge number of companies in environment it could be time consuming. To save your time you could use following job:
static void Job3(Args _args)
{
    MyTable myTable;
    DataArea da;
    int cnt;
    ;
    ttsbegin;
    while select da
    {
        cnt = 1;
        changecompany(da.Id)
        {
            myTable = null;
            while select forupdate myTable
            {
                cnt++;
                myTable.FieldForUniqueness = int2str( cnt );
                myTable.update();
            }
        }
    }
    ttscommit;
}
Another way to solve this problem is to make following steps:
  1. Try to synchronize your table
  2. You get an error saying that there are duplicates
  3. Rright away you go to Administration > Periodic > SQL Administration form.
  4. Select your table in the list and run Table actions > Check/Synchronize command.
  5. In appeared form enable “Check Allow duplicated’” and run.
  6. You will get a list of conflicting records to kill.

Copied from Experts website....... Dynamicsaxtraining.
You can always reach me at axapta4all@gmail.com
Anonymous Axaptian   

Select statement patterns


This article contains descriptions of select statement patterns that can be used in the Microsoft Dynamics AX (Axapta).
The list of select statement patterns provided is as follows:
  1. Enable/Disable condition
  2. Switch condition
  3. Enable/Disable join table with condition

Enable/Disable Condition

Use this pattern when the condition in the “where” clause is dependant of a parameter.
For example, we need to perform some procedure with either all Customer or Customers with invoice account only. It depends on the User input parameter. We create a periodic job with the following dialog box:

Process Customers
Process Customers


We will assume that the Customer with invoice account check box has the dialogField name in the code.
The select statement will have the following view in the “run” method:
while select custTable
where (!dialogField.value() || custTable.InvoiceAccount != '')
If the check box is selected, !dialogField.value() returns false and custTable.InvoiceAccount != ” will be taken into account. If the check box isn’t selected, !dialogField.value() returns true (so there is no sense what return the custTable.InvoiceAccount != ” condition). In other words, if the check box is selected, only Customers with Invoice accounts will be searched. Otherwise, all Customers will be searched.
General structure looks as follows: where (!EnableConditionFlag || condition)

Switch Condition

Use this pattern when either one or another condition dependant of parameter must be applied to the select statement.
For example, we need to perform a procedure with items of either a BOM item or items of other item types. We need to create a periodic job with a dialog box. The dialog box contains only one BOM type checkbox. We will assume that the BOM type check box has the dialogField name in the code.
In the run method, we write the following select statement:
while select inventTable
where ((!dialogField.value() && inventTable.ItemType != ItemType::BOM) ||
       (dialogField.value()  && inventTable.ItemType == ItemType::BOM))
If the BOM type check box is selected, the first parenthesis returns false and everything depends on the second parenthesis where the inventTable.ItemType == ItemType::BOM clause is checked. If the BOM type check box isn’t selected, the second parenthesis returns false and everything depends on the first parenthesis where the inventTable.ItemType != ItemType::BOM clause is checked. In other words, if the check box is selected, the only BOM item will be searched. Otherwise, only not BOM items will be searched.
General structure looks as follows: where ((!Condition2Flag && condition 1) || (Condition2Flag && condition 2))

Enable/Disable Join Table with Condition

Use this pattern when a joined table with a condition can either contain records or be empty.
For example, we need select sales orders without Recipient or terminated Recipient. The SalesTaker field in the SalesTable table stores the Recipient ID. The Status field in the EmplTable table stores the Recipient’s status (None, Employed, or Resigned).
The select statement has the following view:
while select SalesTable
notexists join EmplTable
where EmplTable.EmplId == SalesTable.SalesTaker &&
      EmplTable.status != HRMEmplStatus::Resigned
If EmplTable.status is Resigned or the Sales table record doesn’t have the Recipient, the Sales table record will be selected.
General structure looks as follows: notexists join <TableName> where <relation clause> && (condition != required value)
If you know other interesting patterns, please write them in the comments ;)


Copied from Experts website....... Dynamicsaxtraining.
You can always reach me at axapta4all@gmail.com
Anonymous Axaptian   

Search in AOT


Searching in AOT groups like Classes, Forms, etc. by scanning tree nodes is unacceptable due to performance reasons. For searching in AOT groups you should scan system table UtilElements. See example in SysAotFind form – class SysUtilScanSource.


Copied from Experts website....... Dynamicsaxtraining.
You can always reach me at axapta4all@gmail.com
Anonymous Axaptian  

Module logo


Hi! I have received the following task: Create new module in Dynamics AX and assign image or logo to this module.
Let’s develop this task.
Module is created very easy:
  1. Go to the AOT > Menus and create new menu.  For example TestMenu.
  2. Add menu item. For example CustTable menu item.
  3. Then create new menu reference in the MainMenu menu:
    • On the MainMenu menu clicks the right mouse button and select New > Menu reference. The Select: Menus windows opens.
    • Drag and drop the TestMenu menu from Select:Menus window to the MainMenu.
New menu
New menu


This is all. The new module have been added. Reopen Dynamics AX application.
The new modules appears without image (to move module on the top position clicks the Microsoft Dynamics AX >View > Navigate Pane Options…):

New module without logo


Adding module logo is not so easy. Select the TestMenu menu in the AOT, click right mouse button and select Properties. There are two properties NoramlImage and NormalResource.

Menu properties
Menu properties


In the NormalImage property the file path to the logo could be specified. But if we create product for sell then we can not specify the exact file path because each Customer will have own path.
In the NormalResource property the image id could be specified. It is suitable for our requirements. Let’s add image in Dynamics AX:
  1. Go to the AOT > Resources. Click right mouse button and select Create form file.
  2. Specify the file path and click Open.
The new image resource will be created:

Image resource
Image resource


But this resource doesn’t have the resource id or image id property. Even more in the NormalResource property only the resource id of standard image can be specified. Standard image could be review here AOT > Forms > SysImageResources.
Trick: we will use the NormalImage property and Logo_image_png resource.
Create the following static method:
static client void addImageToModule()
{
TreeNode treeNodeMenu;
;

treeNodeMenu = SysDictMenu::newMenuName(menustr(TestMenu)).parmTreeNode();
if (treeNodeMenu)
{
treeNodeMenu.AOTsetProperty(identifierstr(NormalImage), SysResource::getImagePath(resourcestr(Logo_image_png)));
treeNodeMenu.AOTsave();
}
}

Call this method in the \Classes\Application\startupPost method:

// No SYS code must exist in this method
// If you need the startup command, look in the class SysStartupCmd
void startupPost()
{
;
Class1::addImageToModule();
}

Reopen application.

Module with logo
Module with logo


All the best ;)


Copied from Experts website....... Dynamicsaxtraining.
You can always reach me at axapta4all@gmail.com
Anonymous Axaptian