Setup initial data (Vendor, Warehouse, Equipment)
Hi Axaptians! Before we start the purchase business process, we must set up initial data in Axapta. In this training lesson, we will understand and set up the following:
- Vendor
- Warehouse structure
- Pallets and forklift
As you may remember the initial data from our previous trainings is the follows:
- Company purchases 5,000 items of Bottle Red 0,5 and 3,000 items of Cans Standard Black
- Company vendor is Big bottle company
- Company warehouse structure
- Company pallet types
- Company forklift trucks
- Extend the Bottle and Can dimension to be able to track a pallet and location
Vendor
We may now create the Big Bottle vendor:- Go to Accounts payable > Common Forms > Vendor Details. The Vendors form opens.
- Create a new record by pressing CTRL+N. Fill in the following fields:
- Vendor account = 1000
- Name = Big Bottle
- Group = 50
- Save the record. (If you encounter an error “Number sequence for the reference Address book ID in parameters in the Global address book module has not been set up”,See the Address book number sequence post.
Company warehouse structure
A company’s warehouse physical structure contains the following entities:- Sites. A site is a geographical location. A site includes one or several warehouses.
- Warehouses. A warehouse is a commercial building for storage of goods.
- Aisles. An aisle is a space for walking with rows of seats on either side or with rows of seats on one side and a wall on the other. In warehouses, rather than seats they have a rack to either side.
- Racks. A rack is a material handling storage aid system designed to store materials on pallets. One more rack example.
- Shelves. The rack system composed of shelves.
- Bins. A bin is a position on a shelf.
- Locations. It is a physical place in a warehouse that must be used as one entity. A location can be an entire aisle or a rack, a shelf or a bin. If, for example, a warehouse has aisles and racks only (without shelves and bins), a location is an entire rack.
- Store areas. Store areas group locations by dividing the warehouse
into designated sections for inventory with similar characteristics.
There are two types of store area, and every location is connected to
one of the folowing areas
: Input area and Picking area. An Input area is used in connection with a place where items are stored when they are received as inventory. A Picking area is used to determine picking routes. - Store zones. Store zones are used for prioritizing the store areas for arriving items. The store zones are thus made up of store areas. We will understand the meaning of this entity later in Item arrival and registration post
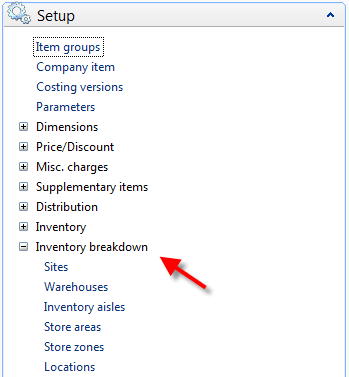
Inventory breakdown folder
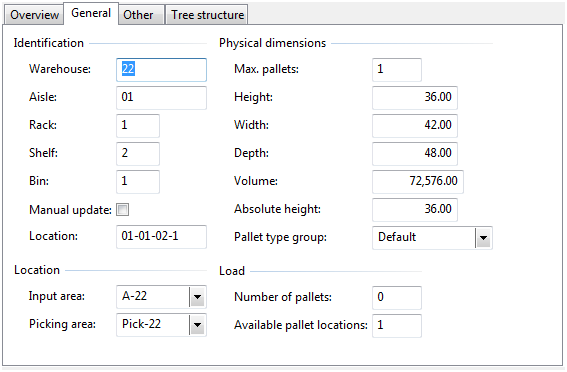
Location example
Let’s find all these settings in Microsoft Dynamics AX. I have prepared several screen shots from our demo data.
To find this setting, take the following steps:
- To open the Warehouses form, go to Inventory management > Setup > Inventory breakdown > Warehouses.
- To view inventory aisles that belong to the current warehouse, click Inquiries > Inventory aisles in the Warehouses form.
- Each aisle (except the Special) contains racks, shelves, and bins. A Location in this case is a Bin.
- From the Inventory aisle form, click the Locations button.
- The Locations form opens. This form shows locations that belong to the current aisle.
- Bulk location. Storage of received items. Identifies locations where items are stored until they are either moved to an outbound dock or used to fill a picking location.
- Picking location. Storage of items ready to picking (for sales process).
- Inbound dock. Location in the warehouse where items are received.
- Outbound dock. Location in the warehouse where shipments take place.
- Production input location. Location is used in the Production module.
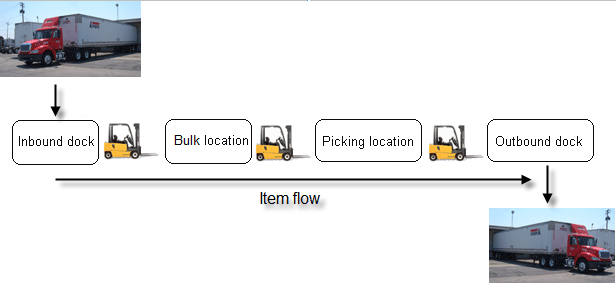
Location types
A few words about a store zone and a store area. In Microsoft Dynamics AX, Warehouse Management store zones and areas are used for automatic placement of items into preferred locations. A store area groups locations. A store zone prioritizes store areas.
Let’s assume that the Bottle item arrives to the In_01 (inbound dock) location. Where must this item be stored? An item is associated with a store zone. This is done through the Warehouse item form.
Take the following steps to associate the Bottle item with a store zone:
- Go to Inventory management > Common Forms > Item details. The Item form opens.
- Find the Bottle item. Select the record and click Setup > Warehouse items. The Warehouse items form opens.
- For all Bottle item’s dimensions, we will use the same setup. We assume that the Bottle item arrives in warehouse 22.
- Create, a new record by pressing CTRL+N. Leave the item’s Dimension field empty and fill in the Warehouse field with the value 22.
- To assign a store zone, click the Locations tab.
- In the Store zone field, enter All-22.
- Save the record by pressing CTRL+S.
We have now set up the All-22 store zone for the Bottle item. Let’s find what store areas belong to this store zone and how store areas are prioritized.
- Go to Inventory management > Setup > Inventory breakdown > Store zones. The Store zone form opens.
- Find the All-22 store zone and click the Store areas tab. The following tab opens:
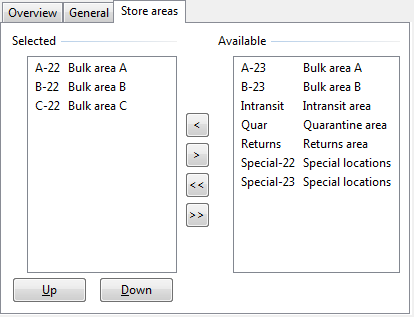
Store zone, Store areas tab
To find what locations belong to store area A-22, take the following steps:
- Go to Inventory management > Setup > Inventory breakdown > Store areas. The Store area form opens.
- Find and select the record for the A-22 store area. Click the Locations button
- The Location form opens. This form tell us what locations are associated with the A-22 store area.

Locations form
Extend item dimensions
The Bottle and Can items have the following storage dimensions: Site and Warehouse. Since we want to track pallets and locations, we need to change the dimension group. What does it mean “to track locations” (or pallets)? It means that all inventory transactions (except those of the status Ordered) must be recorded with a location ID (pallet ID). With the help of this ID, we can inquire about how many Bottles are stored at a certain location or how many Bottles there are on pallet 555, for example.To change the item dimension, perform the following steps:
- Go to Inventory management > Common Forms > Item details. The Item form opens.
- Find and select the Bottle item. Click the General tab and change the Dimension group field value from CS-W to CS-WLP. The CS-WLP dimension group has active Color, Size, Warehouse, Location, and Pallet dimensions.
Set up the Can item with the same value.
Inventory equipment
Now, we will set up pallet types and forklift trucks available in our company. This can be done under the following path: Inventory management > Setup > Inventory equipment.Since a pallet can have different height, width, and depth dimensions, we need to create different pallet types. I suppose that you use the demo data, so I only present a screen shot of the Pallet types form:
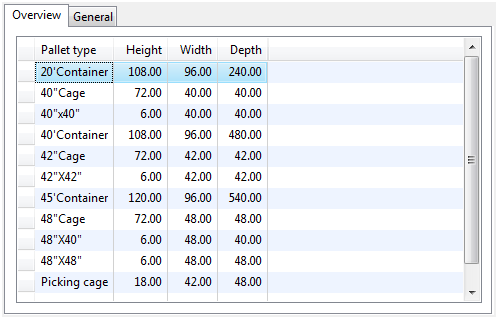
Pallet types form
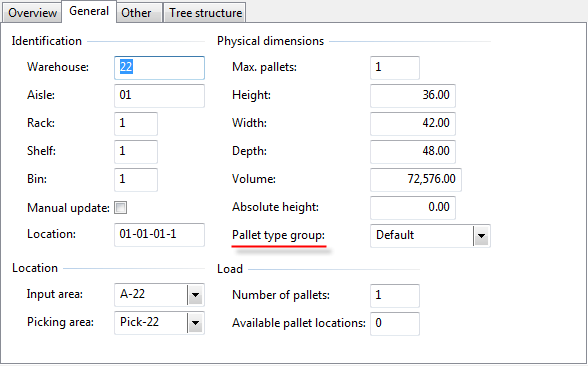
Pallet type group on the Locations form
In my demo data, I have the following pallet groups:
- Default pallet type group contains pallet types:
- 40″x40″
- 42″X42″
- Large pallets pallet type group contains pallet types:
- 48″X40″
- 48″X48″
- Picking cages pallet type group contains pallet type Picking cage

Forklift form
Summary
Today we have set up the initial data for the purchase business process, its receiving part.
Let’s review what we have done:
- Have created the Big Bottle vendor.
- Have understood and set up the company warehouse structure (warehouses, aisles, racks, shelves, bins, and locations).
- Have extended the Bottle and Can dimensions (have added Location and Pallet).
- Have understood and set up company warehouse equipment (pallet types, pallet groups, and forklift trucks).
Copied from Experts website....... Dynamicsaxtraining.
You can always reach me at axapta4all@gmail.com
Anonymous Axaptian
Hi,The benefits that physical evidence provide for Qatar Business is the assurance and guarantee that consumers will gain from the business website, and their online value propositions that they have relation with Incorporation in Qatar.Thanks....
ReplyDeleteVới quy trình giao nhận hàng hóa chặt chẽ nhanh chóng. Đảm bảo dịch vụ giao hàng nhanh của chúng tôi là nhanh nhất. Ngoài ra để phục vụ tốt cho việc kinh doanh của quý khách chúng tôi còn có nhiều dịch vụ khác như: dịch vụ thu tiền hộ, dịch vụ cho thuê kho bãi, dịch vụ chuyển hàng về Đà Nẵng. Hãy liên hệ với chúng tôi nếu bạn có nhu cầu.
ReplyDelete